

Creating a simple camera app for a laptop using Python can be done with the help of the opencv-python library (also known as cv2). This library allows you to capture video from your webcam and display it in a window.
To add face recognition and smile detection functionality to the camera app, you can use OpenCV’s pre-trained Haar Cascades for face and smile detection. Here is an enhanced version of the camera app that includes these features:
- Install the required libraries: Ensure you have
opencv-pythonandnumpyinstalled:
pip install opencv-python
pip install opencv-python numpy
Enhanced camera app code with face and smile detection:
import cv2
import numpy as np
import datetime

# Load pre-trained Haar Cascades for face and smile detection
face_cascade = cv2.CascadeClassifier(cv2.data.haarcascades + 'haarcascade_frontalface_default.xml')
smile_cascade = cv2.CascadeClassifier(cv2.data.haarcascades + 'haarcascade_smile.xml')

def detect_and_display(frame):
    gray = cv2.cvtColor(frame, cv2.COLOR_BGR2GRAY)
    faces = face_cascade.detectMultiScale(gray, 1.3, 5)

    for (x, y, w, h) in faces:
        cv2.rectangle(frame, (x, y), (x + w, y + h), (255, 0, 0), 2)
        roi_gray = gray[y:y + h, x:x + w]
        roi_color = frame[y:y + h, x:x + w]

        smiles = smile_cascade.detectMultiScale(roi_gray, 1.8, 20)
        for (sx, sy, sw, sh) in smiles:
            cv2.rectangle(roi_color, (sx, sy), (sx + sw, sy + sh), (0, 255, 0), 2)
            cv2.putText(frame, 'Smiling', (x, y - 10), cv2.FONT_HERSHEY_SIMPLEX, 0.9, (36, 255, 12), 2)

    return frame

def main():
    # Initialize the webcam (0 is the default camera)
    cap = cv2.VideoCapture(0)

    if not cap.isOpened():
        print("Error: Could not open webcam.")
        return

    # Video writer for recording
    fourcc = cv2.VideoWriter_fourcc(*'XVID')
    out = None
    recording = False

    while True:
        # Capture frame-by-frame
        ret, frame = cap.read()

        if not ret:
            print("Error: Failed to capture image.")
            break

        # Detect faces and smiles
        frame = detect_and_display(frame)

        # Display the resulting frame
        cv2.imshow('Camera', frame)

        # Handle keypresses
        key = cv2.waitKey(1) & 0xFF

        # Capture photo on 'c' press
        if key == ord('c'):
            timestamp = datetime.datetime.now().strftime("%Y%m%d_%H%M%S")
            filename = f"photo_{timestamp}.png"
            cv2.imwrite(filename, frame)
            print(f"Photo captured and saved as {filename}")

        # Start/Stop video recording on 'r' press
        if key == ord('r'):
            if not recording:
                recording = True
                timestamp = datetime.datetime.now().strftime("%Y%m%d_%H%M%S")
                out = cv2.VideoWriter(f'video_{timestamp}.avi', fourcc, 20.0, (640, 480))
                print("Started recording video")
            else:
                recording = False
                out.release()
                print("Stopped recording video")

        # Save video frame if recording
        if recording:
            out.write(frame)

        # Press 'q' to exit the camera app
        if key == ord('q'):
            break

    # Release the webcam and close the window
    cap.release()
    if recording:
        out.release()
    cv2.destroyAllWindows()

if __name__ == "__main__":
    main()
Run the enhanced camera app: Save the code to a file, for example enhanced_camera_app_with_face_smile_detection.py, and run it using Python:
python enhanced_camera_app_with_face_smile_detection.py
Explanation of added functionalities:
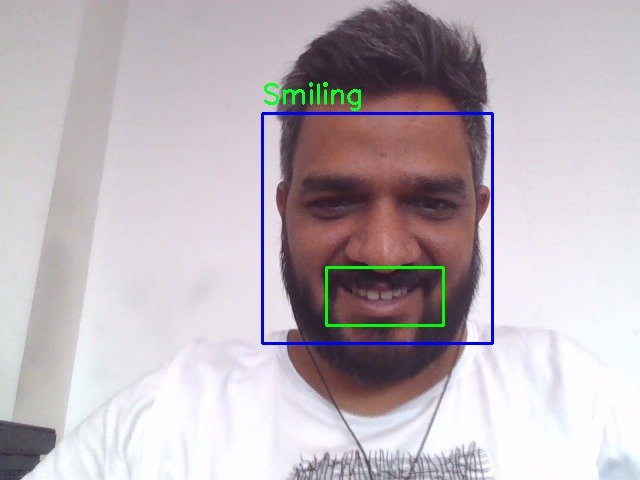
- Face Detection: The
detect_and_displayfunction uses the Haar Cascade for face detection. Detected faces are marked with blue rectangles. - Smile Detection: Within each detected face, the function uses the Haar Cascade for smile detection. Detected smiles are marked with green rectangles, and the text “Smiling” is displayed above the face.
- Grayscale Conversion: The frame is converted to grayscale for face and smile detection, as the Haar Cascade classifiers work on grayscale images.
This enhanced camera app detects faces and smiles in real-time and displays the results on the video feed. You can further expand it by adding more features, optimizing performance, or integrating it with other libraries for additional functionalities.